UV DTF transfer opens new possibilities for vibrant, durable designs on textiles, delivering sharp imagery and fast turnaround. To ensure consistent results, you’ll start with UV DTF transfer materials chosen for reliable adhesion and faithful color reproduction. A reliable UV DTF printer setup is essential for precise ink deposition, accurate curing, and reproducible results. Understanding the DTF transfer workflow helps you streamline from design to finished garment and minimize production waste. Equally critical are selecting the right DTF ink and films, and pairing them with a heat press for DTF to achieve durable, wash-ready images.
In broader terms, this technology can be described as a digital textile transfer that uses UV-curable inks to bond designs to fabrics. Other LS I-friendly terms include UV-curable ink film transfer, UV-LED cured textile printing, and adhesive film-based transfers that share the same workflow. By framing the topic with these related terms, you align content with search intent around substrate compatibility, curing dynamics, and long-lasting adhesion.
UV DTF Transfer Materials: Building a Reliable Foundation
A strong start for UV DTF transfer lies in selecting the right UV DTF transfer materials. The core set includes a transfer film (typically a clear PET film), adhesive powders or powder-free adhesive options, coating layers, and the UV-curable inks used by your printer. The film must be compatible with your printer’s ink system, and the adhesive should bond reliably to your chosen fabric or substrate. When choosing UV DTF transfer materials, consider opacity, gloss versus matte finishes, and how the film handles color transfer on darker fabrics.
Beyond the basics, pay attention to how DTF ink and films interact with your intended substrate. The film, ink, and adhesive must be chosen with fabric type in mind — cotton, blends, polyester — and end-use, whether apparel, bags, or accessories. The right heat press or curing equipment is essential for final transfer, with adjustable temperature, time, and pressure to suit different films. Don’t overlook protective gear and a clean workspace to maintain print quality and operator safety.
UV DTF Printer Setup: Keys to Consistent, Vibrant Prints
A reliable UV DTF printer setup hinges on choosing UV-curable inks and a precise drying or curing mechanism. Ink reliability, color gamut, and adhesion on textiles are critical factors, so use inks designed for ultraviolet curing to ensure strong color stability, gloss, and wash-fastness. Pair this with a printer setup that supports consistent ink flow, proper curing distance, and reliable cooling.
Regular calibration and color management are essential to maintain repeatable results. Profile your printer with color charts that reflect the materials you’re using, and maintain a color-managed workflow from design to press. Routine maintenance, nozzle checks, and alignment checks help prevent drift and ensure edge definition stays sharp across runs.
DTF Transfer Workflow: From Design to Transfer, Efficiently
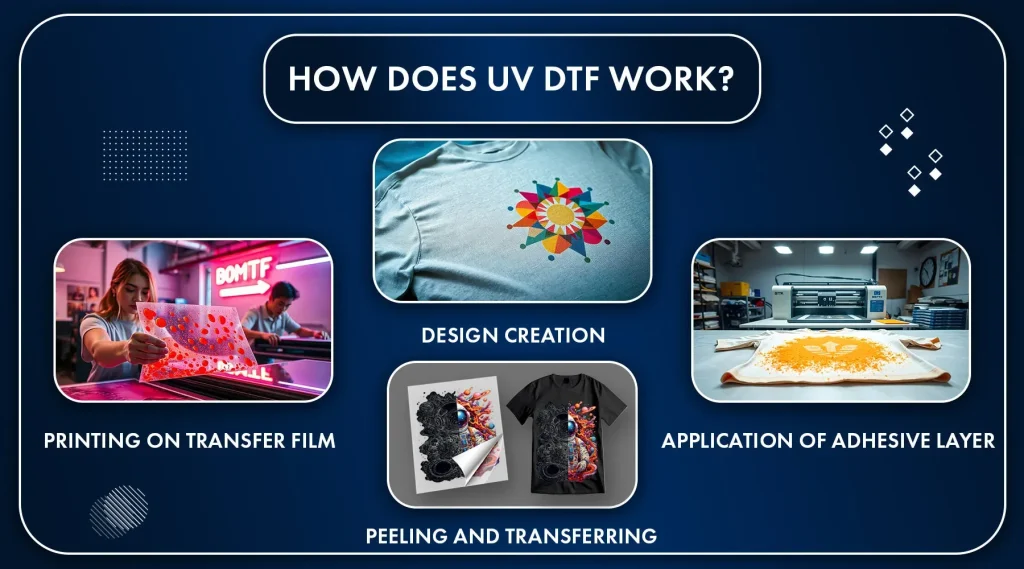
A streamlined DTF transfer workflow moves from design to print, cure, and press with minimal waste and downtime. Start with artwork prepared in the correct color profile and dimensions, then print on the transfer film using UV-curable inks. After printing, apply adhesive if you’re using powder-based options, and cure according to material guidelines to lock in color and ensure film flatness during transfer.
The real efficiency comes from a well-planned sequence: curing, alignment, and pressing with consistent temperature, pressure, and dwell time. Follow product guidelines for edge-to-edge designs, keep surfaces clean to avoid dust or smudges, and finish with a controlled peel post-press to maintain image integrity.
DTF Ink and Films: Matching Materials for Fabric-Friendly Results
Choosing the right DTF ink and films is central to durability and color accuracy. Ink formulations are tuned for ultraviolet curing, with attention to color gamut, wash-fastness, and adhesion on various textiles. The film should be strong enough to withstand powder-based or powder-free adhesive processes while remaining thin enough for clean release and sharp detail.
Compatibility matters: some films suit darker fabrics better, while others excel on light fabrics. Verify fabric compatibility with your chosen ink and film combo and plan for your end-use — whether apparel, bags, or accessories. A well-matched set of DTF ink and films also supports consistent bonding across washes and daily wear.
Heat Press for DTF: Master Temperature, Time, and Pressure
A reliable heat press is crucial for final transfer success. The temperature, dwell time, and pressure settings must align with the film and fabric type, and an adjustable press with a digital readout helps ensure repeatable results. Consistent platen contact is key to uniform color transfer and to minimize scorching or edge gaps.
In some UV DTF workflows, post-press steps like curing or a light post-bake may be required to maximize durability. Build a routine that includes pre-heating the press, verifying calibration, and conducting wash tests on sample fabrics to confirm the transfer holds up under regular wear. Safety gear and efficient workspace setup will also support a smoother pressing process.
Troubleshooting and Maintenance for Long-Lasting UV DTF Results
Even with the right materials and setup, issues can arise. Common challenges include color drift or misregistration, uneven color density, and poor adhesion at the edges. Recalibrate color profiles, re-check alignment marks, and ensure the transfer film remains flat during printing and pressing. Tighten the registration process in your design workflow to minimize misalignment.
Post-press troubles like cracking after washing or ghosting can stem from fabric choice, adhesive compatibility, or insufficient curing. Reassess wash conditions, experiment with different temperature/time settings, and verify adhesive and film compatibility for the fabric you’re using. Regular maintenance, cleaning, and operator training help prevent recurring problems and keep UV DTF transfers performing at their best.
Frequently Asked Questions
What is UV DTF transfer and how do UV DTF transfer materials affect print quality?
UV DTF transfer is a process that uses UV-curable inks on a specialized transfer film with an adhesive layer, then presses the film onto textiles. The choice of UV DTF transfer materials—film, adhesive, and inks—directly influences color vibrancy, opacity, wash-fastness, and texture. Choosing compatible UV DTF transfer materials and following the printer’s guidelines helps achieve sharp details and durable results.
What does UV DTF printer setup involve for reliable results?
A solid UV DTF printer setup starts with loading UV-curable inks, aligning the printhead, and calibrating color management. Ensure the transfer film runs cleanly, verify curing parameters, and configure the printer for your chosen DTF transfer workflow. Regular maintenance reduces head clogs and color drift.
Can you outline the DTF transfer workflow from design to finished garment?
The DTF transfer workflow typically includes design and color management, printing on the transfer film with UV inks, applying adhesive (if using a powder-based system), curing, aligning on the substrate, pressing with appropriate heat, and peeling the film. Finishing steps may include post-curing and wash testing to verify durability.
How should I choose DTF ink and films for UV DTF transfer to maximize durability?
Select DTF ink and films that match your fabric type (cotton, blends, polyester) and the adhesive system you use. Check compatibility with your UV DTF printer setup and the desired finish to ensure strong adhesion, color fidelity, and wash-fastness.
What heat press settings are recommended for DTF transfers using UV inks?
Follow the film and adhesive manufacturer guidelines and test on swatches. Typical ranges start around 150–170°C (300–340°F), with moderate pressure and a dwell time of 10–15 seconds, then a controlled cooldown to reduce edge artifacts.
What are common UV DTF transfer challenges and how can I troubleshoot them?
Common issues include misregistration, uneven color density, poor adhesion, cracking after washing, and ghosting. Troubleshoot by recalibrating color profiles, verifying alignment marks, ensuring film lies flat, adjusting temperature, pressure, and time on the heat press, and confirming fabric compatibility with the adhesive.
| Aspect | Key Points |
|---|---|
| Materials |
|
| Tools |
|
| Setup |
|
| Printing and Transfer Process |
|
| Common Challenges and Troubleshooting |
|
| Maintenance and Best Practices |
|
Summary
UV DTF transfer is a flexible, high-quality method for decorating textiles and other substrates. By carefully selecting UV DTF transfer materials, equipping your workspace with the right tools, and following a disciplined setup and workflow, you can achieve reliable results across small runs and on-demand orders. With robust color management, proper curing, and thorough quality checks, UV DTF transfer produces durable, vibrant results that withstand washing and daily wear. This approach suits hobbyists expanding into professional projects as well as shops optimizing production. A well-executed UV DTF transfer workflow can become a core capability in your customization toolkit.