DIY UV DTF Transfer opens a new world of at-home customization for crafters and small business owners. Think of this as a DTF transfer tutorial for beginners that blends UV-curable inks with a direct-to-film workflow to produce vibrant, durable results suitable for UV DTF printing at home. If you’re wondering how to make DTF transfers at home, this guide walks you through the essentials in a straightforward, practical way. It doubles as a beginner DTF transfer guide, outlining gear checks, temperature ranges, and step-by-step instructions you can follow confidently. Plus, you’ll find practical DIY UV DTF transfer heat press tips to help you dial in pressure, time, and finish quality.
Beyond the exact DIY UV DTF Transfer label, this method can be described as at-home DTF printing with UV-curable inks, a film-based transfer workflow, or a compact heat press approach. For those researching UV DTF printing at home, focus on design clarity, substrate compatibility, and curing workflow to ensure durable results across fabrics and surfaces. This alternative framing supports broader discovery and aligns with SEO by connecting related concepts such as heat press settings, powder adhesion, and post-transfer care.
DIY UV DTF Transfer: What It Is and Why It Matters
DIY UV DTF Transfer blends Direct-to-Film printing with UV-curable inks to create vibrant, durable transfers that cure quickly under UV light. This approach lets crafters and small businesses produce custom apparel and fabric pieces at home without expensive equipment. The result is sharper color, better adhesion, and a workflow that suits hobbies and small-run production.
If you’ve followed a DTF transfer tutorial or read a beginner DTF transfer guide, you’ll recognize the same core advantages: clearer images, wider substrate options, and faster handling times. DIY UV DTF transfers also reduce bottlenecks by speeding up curing steps and enabling on-demand production in a home studio.
Getting Started: Tools, Materials, and Settings for DIY UV DTF Transfer
Before you print, assemble the essentials: design software with layered files, a printer compatible with UV-curable inks or a UV-enabled DTF printer, DTF transfer film, adhesive powder, a heat press, protective sheets, carrier sheets, and a curing light if your workflow requires it. Having the right toolkit helps you move smoothly from concept to finished transfer.
Consider following a beginner DTF transfer guide as you dial in temperature, time, and pressure. Establish a simple, repeatable workflow and log your results so you can improve project to project and build confidence for future runs.
Designing for DTF: Artwork Preparation and Substrate Considerations
Create artwork with high contrast and clean edges, ensuring color separations match your ink set. Mirror or flip the design when required by your workflow, and keep a layered file so you can edit elements without re-exporting. This mirrors best practices you’d find in a DTF transfer tutorial and helps you proof designs quickly.
Substrate choice matters as much as design. Cotton and cotton blends tend to produce vivid results, but synthetics may require different heat, pressure, or curing. Run small test patches on fabrics similar to your final product, and document how each fabric responds to UV inks and the adhesive powder as you build your DIY UV DTF transfer skills.
Printing on DTF Film with UV Ink: A Practical Guide
When you’re learning how to make DTF transfers, set your print resolution to a high level—about 600–1200 dpi—to preserve details and gradients. Make sure you print to the correct side of the film and manage color profiles to avoid hue shifts during the transfer.
After printing, prepare for curing and handling. If your workflow uses UV-curing inks, follow the manufacturer’s post-print exposure guidance to prevent smudging or color shifts. For home setups, a UV lamp or curing station can speed production and improve throughput with UV DTF printing at home.
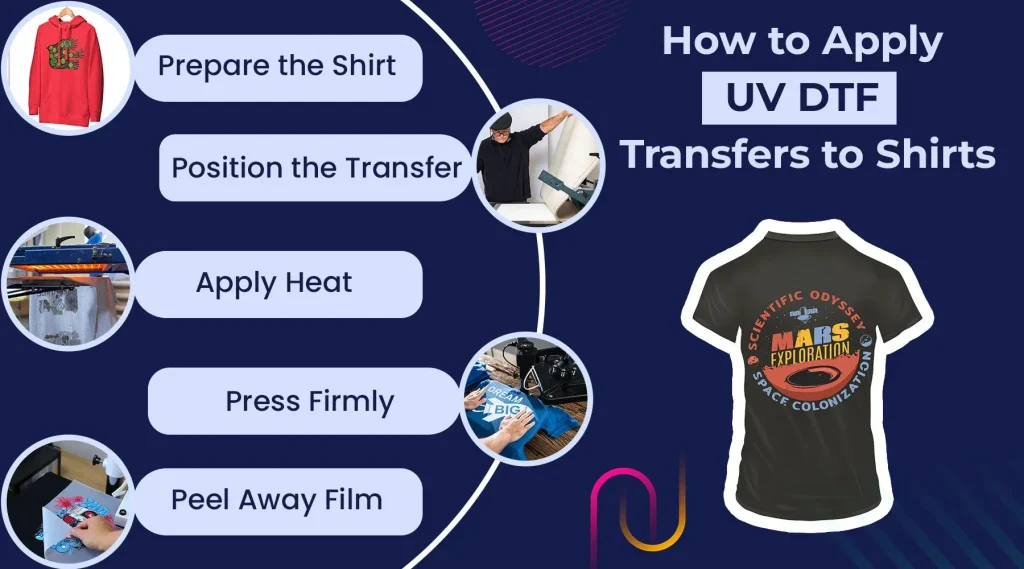
Curing, Powdering, and the Transfer: Techniques for Durability
Powder adhesion is the bridge between the printed film and the garment. Lightly apply adhesive powder, distribute it evenly, and cure per your manufacturer’s instructions. This is where DIY UV DTF transfer heat press tips come into play, helping you tune powder coverage to reduce crumbling and improve transfer durability.
Proceed to the transfer with the recommended heat, time, and pressure. Many inks benefit from a warm peel, but always follow the guidance for your specific film and ink system. If needed, re-cover and press again to ensure full adhesion and edge integrity.
Troubleshooting, Care, and Safety: Maintaining Quality
Common issues include color fading after washing, misalignment, or cracking at the edges. These usually stem from insufficient curing, uneven powder application, or inconsistent heat. Keep a running log of settings and results to identify patterns and adjust temperature, time, and pressure accordingly—the practical core of a beginner DTF transfer guide.
Safety and care matter as you scale up. Work in a ventilated area, store films and powders properly, and protect finished items from sunlight to prevent fading. Regular maintenance of your heat press and a clean workspace help you sustain consistent, high-quality transfers across projects.
Frequently Asked Questions
What is DIY UV DTF Transfer and why should I consider following a DTF transfer tutorial?
DIY UV DTF Transfer is an at‑home method that uses UV‑curable inks on a Direct‑to‑Film (DTF) workflow to create vibrant, durable fabric prints. Following a DTF transfer tutorial helps beginners learn the correct sequence—design, print, powder, cure, pre‑press, and transfer with a heat press—reducing mistakes. Benefits include sharper color, faster curing, and broad substrate options. Start with small test patches and follow the ink and film manufacturer guidelines for best results.
How can I do UV DTF printing at home using a beginner DTF transfer guide?
Yes—UV DTF printing at home is achievable with a clear beginner DTF transfer guide. You’ll typically use UV‑curable inks, adhesive powder, and a compatible heat press. Begin with short, controlled tests on similar fabrics to tune temperature, time, and pressure. Always follow safety guidelines and the specific recommendations from your ink, film, and printer suppliers.
How do I make DTF transfers using the DIY UV DTF transfer workflow?
To make DTF transfers with the DIY UV DTF transfer workflow: design your artwork, mirror if required, and print on UV‑ready film. Apply adhesive powder evenly, cure as directed, and pre‑press the garment to remove moisture. Transfer at about 300–320°F (150–160°C) for 12–20 seconds, then perform a warm or cold peel as recommended. Finish with post‑press care to ensure durability.
What are essential DIY UV DTF transfer heat press tips I should know?
Key heat press tips for DIY UV DTF transfers include setting the temperature around 300–320°F (150–160°C), applying even pressure, and conducting test patches first. Pre‑press the garment to remove moisture, protect the print with a sheet, and choose between warm or cold peels based on your film/ink guidelines. Calibrate your press using small trials and document the results for future projects.
Which fabrics work best for DIY UV DTF transfers and how can I test substrates as a beginner?
Cotton and cotton blends typically deliver vivid results with DIY UV DTF transfers, while synthetics may need adjusted heat and timing. As a beginner, use a simple test patch approach: print small samples on each fabric type, run through your heat press settings, and compare adhesion and color. Create a simple substrate test log to speed up future projects.
What common issues occur with DIY UV DTF transfers and how can I fix them?
Common issues include faded colors after washing, misalignment, and edge cracking. Fixes involve ensuring proper UV ink curing, calibrating heat press temperature and time, confirming correct peeling method, and checking powder distribution. Always test patches first, use alignment guides, and maintain your equipment to prevent recurring problems.
| Aspect | Key Points |
|---|---|
| Definition | DIY UV DTF Transfer blends DTF printing with UV-curable inks for faster curing, sharper colors, and broader substrate compatibility. |
| Why it matters | Enables at-home customization, reduces outsourcing, and supports small runs with quicker turnaround. |
| Workflow overview | Design → print on UV DTF film → powdering → curing → pre-press → transfer → post-transfer care. |
| Materials & tools | UV-curable inks or UV-enabled DTF printer; DTF film; adhesive powder; heat press; protective sheets; curing light if needed. |
| Settings & tips | Typical temperatures around 300–320°F (150–160°C) for 12–20 seconds; test patches recommended; ensure proper curing. |
| Troubleshooting | Faded colors, misalignment, cracking; fix by calibrating heat, checking peel method, ensuring proper pre-press and powder distribution. |
| Safety & maintenance | Ventilated work area; store materials properly; inspect heat press components regularly; maintain a clean work area. |
| Expansion & skill-building | As you gain confidence, try larger designs, multi-layer prints, and combining UV DTF with other methods; document settings to accelerate future projects. |
Summary
DIY UV DTF Transfer is a powerful at-home path for crafting custom apparel and fabrics with professional-looking results. This overview highlights how it blends DTF printing with UV-curable inks to deliver sharp colors, faster curing times, and broader substrate compatibility. The step-by-step workflow covers design, printing on UV-friendly film, powdering, curing, pre-press, transfer, and post-transfer care, making it accessible to beginners. By starting with small test patches and calibrating heat, pressure, and curing settings, crafters and small businesses can build confidence and scale projects over time. The DIY UV DTF Transfer approach emphasizes hands-on learning, durability, and quality fabric prints that endure regular wear and washing.